In a recent episode I rambled about a system that pays good guys for finding and reporting security holes in the software we rely on every day. Fired up with enthusiasm for the cause, I sent this message to HackerOne:
I appreciate what you are doing here, and would love if there were a tip jar where I could contribute to the rewards you give out for making the world a better place. Like Zaphod, I’m just a guy, you know? But I’d happily pitch a little bit each month to promote what you do here, and to support the people who actually make the Internet less unsecure.
I debated “insecure” versus “unsecure”, and went with “un” for reasons I don’t exactly recall. Beer may have been a factor.
I got a very nice letter back.
Thank you so much for reaching out to us with this feedback on what we are doing. We appreciate you taking the time to reach out to speak with us about what you think of the program and how you would like to participate it make HackerOne a success.
You are correct about us not having a tip jar, however, our community can support us by word of mouth let others know what we do and what our goal is and if you are a hacker or know any white hat hackers we encourage you all to use our platform and help us with making the internet safer.
We really do appreciate you reaching out and I am going to share your message with the rest of the company.
Best,
Shay | HackerOne Support
The missing word and tough-to-parse sentence make me think that this was a hand-typed response. I am happy to contribute to their word-of-mouth buzz. I do not fit the profile of the geek HackerOne is looking for, and I suspect no one who will ever read these words is pondering the question “How can I break things and still be a good guy?” But if that’s you, head to HackerOne.
On the other hand, If you own a commercial Web site and want to get a major security audit, consider posting a bounty at HackerOne. You’ll get some really skilled people trying to break in, only in this case they won’t rob you blind if they get in.
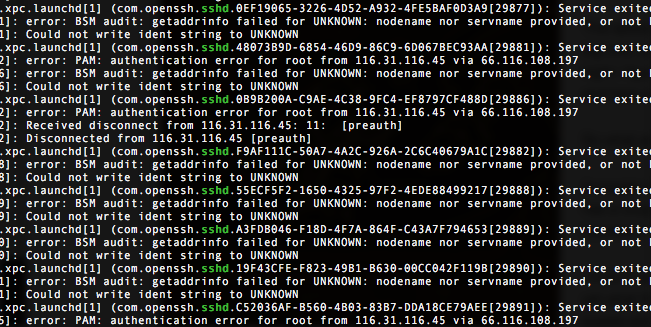
Every once in a while I check the logs of the server that hosts this blog, to see if there are any shenanigans going on. And every time I check, there ARE shenanigans. The Chinese have been slowly, patiently poking at this machine for a long, long time. The attacks will not succeed; they are trying to log in as “root”, the most powerful account on any *NIX-flavored computer, but on my server root is not allowed to log in from the outside, precisely because it is so powerful.
But the attack itself is an interesting look at the world of institutionalized hacking. It is slow, and patient, only making an attempt every thirty seconds or so. Many attack-blockers use three tries in a minute to detect monkey business; this will fly under that radar. Trying fewer than 200,000 password guesses per day limits the effectiveness of a brute-force attack, but over time (and starting with the million most common passwords), many servers will be compromised.
And in the Chinese view, they have all the time in the world. Some servers will fall to their attacks, others won’t. The ones that are compromised will likely be loaded with software that will, Manchurian-Candidate style, lie dormant until the Chinese government decides to break the Internet. And although servers like mine would provide excellent leverage, located as it is in a data center with high-speed access to the backbone, the bad guys have now discovered that home invasion provides a burgeoning opportunity as well. Consider the participation of refrigerators and thermostats in the recent attack on the Internet infrastructure on the East Coast of the United States and you begin to see the possibilities opened by a constant, patient probing of everything connected to the Internet.
I’ve been boning up on how to block the attack on my server; although in its current form the attack cannot succeed, I know I’ve been warned. The catch is I have to be very careful as I configure my safeguards — some mistakes would result in ME not being able to log in. That would be inconvenient, because if I’m unable to log in I won’t be able to fix my mistake. But like the Chinese, I can take things slowly and make sure I do it right.
Luckily for my productivity this afternoon, the Facebook page-loading feature was not working for me. I’d get two or three articles and that was it. But when it comes to wasting time, I am relentless. I decided to do a little digging and figure out why the content loader was failing. Since I spend a few hours every day debugging Web applications, I figured I could get to the bottom of things pretty quickly.
First thing to do: check the console in the debugger tools to see what sort of messages are popping up. I opened up the console, but rather than lines of informative output, I saw this:
Stop!
This is a browser feature intended for developers. If someone told you to copy-paste something here to enable a Facebook feature or “hack” someone’s account, it is a scam and will give them access to your Facebook account.
It is quite possible that most major social media sites have a warning like this, and all of them should. A huge percentage of successful “hacks” into people’s systems are more about social engineering than about actual code, and this is no exception. The console is, as the message above states, for people who know what they are doing. It allows developers to fiddle with the site they are working on, and even allows them to directly load code that the browser’s security rules would normally never allow.
These tools are built right into the browsers, and with a small effort anyone can access them. It would seem that unscrupulous individuals (aka assholes) are convincing less-sophisticated users to paste in code that compromises their Facebook accounts, perhaps just as they were hoping to hack someone else’s account.
I use the developer tools every day. I even use them on other people’s sites to track down errors or to see how they did something. Yet it never occurred to me that I could send out an important-sounding email and get people to drop their pants by using features built right into their browsers.
It’s just that sort of blindness that leads to new exploits showing up all the time, and the only cure for the blindness is to have lots of people look at features from lots of different perspectives. Once upon a time Microsoft built all sorts of automation features into Office that turned out to be a security disaster. From a business standpoint, they were great features. But no one thought, “you know, the ability to embed code that talks to your operating system directly into a Word doc is pretty much the definition of a Trojan Horse.”
So, FIRST, if anyone asks you to paste code into the developer’s console of your browser, don’t. SECOND, if you are in charge of a site that stores people’s personal data, consider a warning similar to Facebook’s. Heck, I doubt they’d complain if you straight-up copied it, link and all. THIRD, just… be skeptical. If someone wants you to do something you don’t really understand, don’t do it, no matter how important and urgent the request sounds. In fact, the more urgent the problem sounds, the more certain you can be that you are dealing with a criminal.
A while back a buddy of mine had trouble with his washer. He was pinched for cash, so he tackled the problem himself, rather than call a repair man. He got some information off the Internet before he started, not all crystal-clear, but enough to dive in.
He fixed his washer. But along the way he did something else, as well: He carefully documented each step of the process, with commentary, lessons learned, and pictures. In the process not only did he save himself a hundred bucks or more, he helped a lot of other folks as well. It’s the most-hit page on his blog (last I heard), and for good reason. Here’s the tutorial, in case your washer’s not draining.
Sidebar: It’s a little frustrating for a blogger to create an episode that’s not the main focus of the blog and have that episode take off. In my case it was “New York Sucks”. But at least “How to Fix Your Washer” has some benefit to the world at large. Lately my tutorial about setting up a LAMP stack using MacPorts has become more popular, which makes me feel better.
Let’s take a moment more to understand why my friend’s blog episode was so effective. First, there was the voice: “I’m just Joe Homeowner with a couple of wrenches and a mysterious machine that’s not working right. But I fixed the bastard.” Second, the tutorial answered a specific need. Third, Joe Homeowner was there with you every step of the way, with pictures and the kind of observations that never appear in service manuals.
The most effective reference materials are almost never videos. When I’ve got both hands tied up with the task, I just want to be able to look at the screen and see what I need to know. I want a still image I can absorb at my pace, and look for reference points to reconcile with what’s in front of me. I want to read the instructions three times without having to rewind.
This is the sort of content ‘they’ were thinking about twenty years ago when they were trying to convince us that the Internet was a good thing.
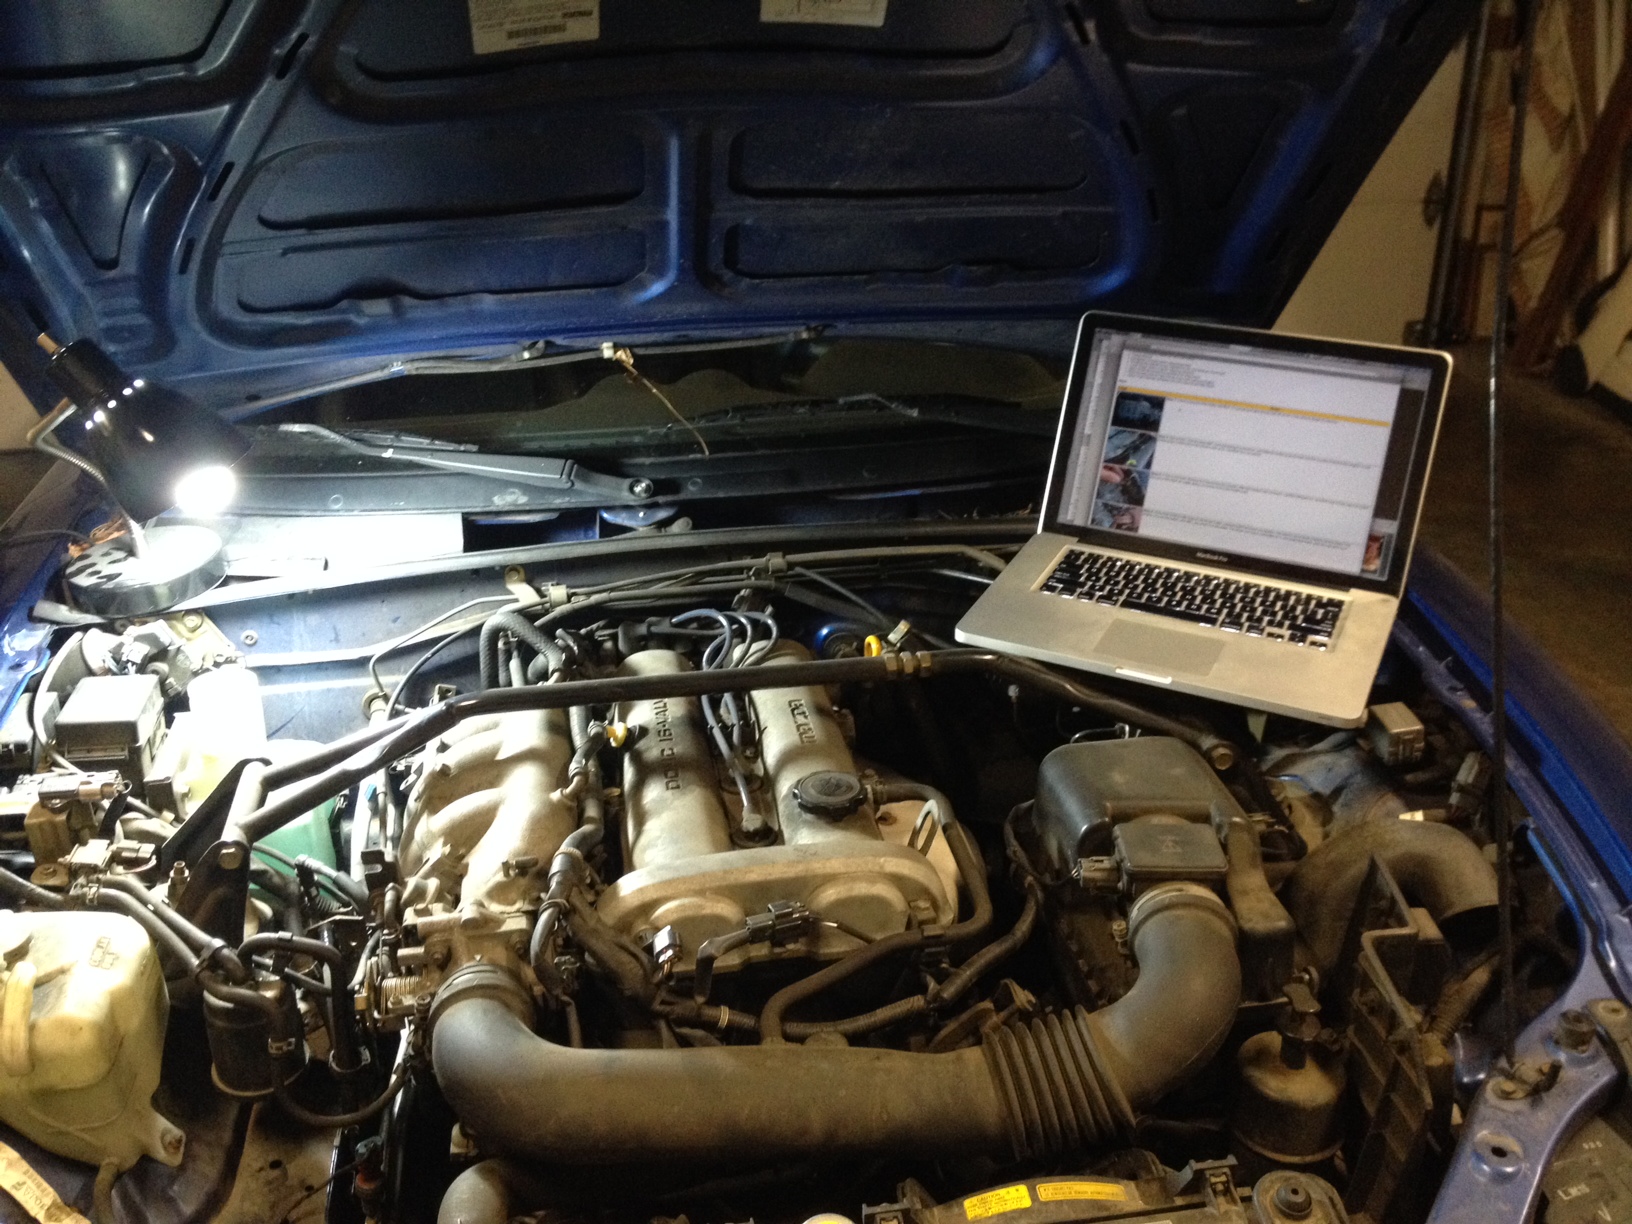
Last weekend I benefitted from a similar tutorial. Owners of 1999 and 2000 Miatas know code P0402: Excessive EGR flow. Usually a P0401 comes first. It’s a design flaw; there’s a narrow passage in the intake manifold that gets clogged. The killer is that the ol’ 402 suggests that a $200 part needs to be replaced. Actually, that’s almost never true in this car. All you have to do is remove the throttle body, take off the top part of the intake manifold, and clean that passage out.
Reference material close at hand, I’m ready to fix my car.
The task is not difficult, but it can be intimidating. What you need is some guy like you who’s done it, who took pictures, who remembers the details, and isn’t afraid to admit he was a little frightened going in. You can feel his satisfaction as you read the how-to and you know you will feel that way too.
The ONE THING I wish he might have mentioned was “when you take the age-hardened hose off the top of the intake manifold, be careful not to break the PCV valve.” But that’s a topic for another episode.
There’s a tutorial out there for almost everything. Almost. Next time you’re facing a task, if you can’t find a good set of instructions on the Internet, do the Web a favor. Make the first tool you pick up a camera. Take a little longer on your repair, record each step, and remember your moments of uncertainty and how you dealt with them. Put it out there and make the world a better place.
I was reading up on the big-ass comet (who’s name is not actually ISON) heading our direction, and the article mentioned that the discovery had been confirmed by iTelescope (among others). (REAL QUICK digression: I really like the word “precovery” — Once the discoverers said, “hey, there’s a comet there!” other astronomers were able to use data gathered before the official “discovery” to confirm the finding. Precovery.) So anyway, Since I work at the company that invented put-an-i-on-it product naming, I had no choice but to look into this iTelescope thing. I had this idea that maybe there were a million webcams all pointed at the sky, and with the combined computing power of the participants a useful image could be inferred.
Of course, I was wrong. It was early in the morning and the caffeine hadn’t reached the critical parts of my brain — the parts that would have considered the logistical nightmare my “global fly-eye” idea would entail. Maybe in a few more years…
But what I did find is entirely cool, and has the benefit of actually working. iTelescope is a cooperative that has some 20 pretty-dang-good telescopes, and for a fee you (yes, you) can use them to take pictures of the sky. (The difference between ‘telescope’ and ‘camera’ is all in the lens.) iTelescope has three facilities around the globe (New Mexico, Spain, and Australia), so it’s always night somewhere. You control the telescope over the Internet and download your results. Oh, these times we live in. (In these times, it must also be said: you retain all rights to the photos.)
How much does it cost? That depends on the telescope you choose and the phase of the moon. Prices start in the neighborhood of seventeen bucks an hour and go up from there. That seems like a lot of money, until you consider what it would cost to get these images on your own. Eleven (at least) have even been honored as APOD.
It feels odd to think of it as ‘photography’ when you’re so disconnected from the camera – heck, you’ll probably never even see the telescope you’re using. Many of the other decisions one makes in terrestrial photography are moot as well — there’s no depth of focus to deal with, for instance. Someone else has set up the camera; all you have to do is point it. Except, when you look at the gallery, you see that there are many images that combine dozens of exposures, some with different filters, sometimes with different data coming from different telescopes. Dang. Seriously, how many photographers have access to such a vast array of gear? (Answer: now, we all do.)
There is still an art to getting that spectacular deep-space image, and just as a fashion photographer has assistants to handle the details, iTelescope users have the iTelescope staff and a helpful Web robot. Good times, my friends. Good times.
The other day I was looking for something completely unrelated and I came across an interactive diagram that shows what information is protected when you use a secure Web connection. The diagram also mentions something called “Tor”, which protects other parts of the information that gets transmitted with every message your computing device sends over the Web.
In a nutshell, Tor makes it impossible (as far as we can tell) to trace a message from source to destination. This could be really, really beneficial to people who would like to, for instance, access a site their government does not approve of. (If that government already suspects the citizen is accessing a forbidden site, they can still put sniffers on either end of the pipeline and infer from the timing of messages that the citizen is acting in an unpatriotic fashion, but they can’t just put a sniffer on the forbidden end to see who happens by.)
There are lots of other times you might want to improve your privacy; unfortunately not all those activities are legal or ethical. A lot of verbiage on Tor’s site is to convince the world that the bad guys have even better means of protecting privacy, since they are willing to break the law in the first place. Tor argues that they are at least partially evening the playing field. They mention reporters protecting sources, police protecting informants, and lawyers protecting clients. My take: you had me at “privacy”.
To work, Tor requires a set of volunteer middlemen, who pass encrypted and re-encrypted messages from one to another. Intrigued, I looked into what would be involved in allocating a slice of my underused server to help out the cause. It’s pretty easy to set up, but there’s a catch. If you allow your server to be an “exit point”, a server that will pass messages out of the anonymous network to actual sites, sooner or later someone is going to be pissed off at someone using the Tor network and the only person they’ll be able to finger is the owner of the exit point. Legal bullshit ensues.
Happily, there are lawyers standing by to protect the network, and some of them might even be itching for a showdown with The Man. Still, before I do anything rash, I need to check in with the totally awesome folks at MacMiniColo, because shit could fall on them, since my server is in their building. If they have qualms (they are not a large company), then I could still be a middle node in the network, and that would help some. But simply because of the hassles involved with being an exit node, that’s where I can do the most good.
I’ll keep you posted on how this shakes out. I need to learn more. If I decide to move ahead, there’s a lot of p’s to dot and q’s to cross, and my server company may ixnay the whole idea. In the meantime, check out Tor, especially if you have nothing to hide.
A recent attempt at comment spam on my blog was a message heavy with phrases designed to get a search engine riled up: Attorney Personal Injury Las Vegas, Attorney Personal Injury, Lawyer Personal Injury, Our lawyer handles all the legal matters professionally!
By putting those phrases here, not connected to the Web site of the sleazy lawyer resorting to illegal practices to promote his business, I weaken the search engine power by diluting the phrase. I think. That or I get blacklisted by the Goog.
But it seems like there should be more I can do. Here, on my blog, is a law firm breaking the law. Let me say that again, so you get the full feel of it. A group of people who are bound to upholding the law, are breaking the law right here and now.
From their Web site (careful not to actually click any link in the spam), I sent them this message:
You guys are lawyers. Yet you, or agents employed by you, are engaging in illegal spamming. Really, you guys should be smarter than that.
Fix it.
No reply, though days have passed now. There won’t be a reply. But I’m watching my spam bin with a little extra diligence right now; the next one is going to the Nevada Bar Association.
In the meantime, I got a glut of comment spam from a Forex trading site. Forex (foreign exchange) is the practice of trading currency, a high-risk practice of predicting the perceived values of global currencies, and the pool is filled with sharks ready to fleece ordinary joes who somehow get the impression that there’s quick money in those markets. The brokers brag that they have a can’t-lose system, and the unsophisticated suckers buy in, lose their money, the brokers pocket the profits, and the system worked. It really is a can’t-lose system — for the brokers.
So, when I got a heapin’ helpin’ of spam from a Forex site, I decided once more to play an activist role. I went to the site (as always, careful not to use the link in the spam directly) and it seemed to be devoted to exposing the bad guys. They’re called the Forex Peace Army, or FPA. Still, a spamming asshole is a spamming asshole. I sent them a message:
While your site makes it appear that you want to be one of the good guys, you are engaged in illegal spam activities. That is disappointing, and hypocritical. Please stop.
And they wrote back! To paraphrase (and infer just a bit): Sorry, but some jerks we pissed off have started a spam smear campaign. Any data you can give us might help us bring them down.
Alas, it looks like the jerks outsourced their libelous campaign; the spams I got came from China. Still, I’m sending them the data, in hopes that maybe somewhere along they way the FPA will catch a break and get the evidence they need. And you have to like an organization named Forex Peace Army. I picture a shark in tie-die.
Tonight I came home to discover that whenever I looked at this site, it was wrapped in advertising. Yikes! I was relieved to discover that it was ‘only’ on my machine; I had unknowingly inherited a browser extension that turned Safari into a giant billboard. Panic gave way to annoyance.
The creator of this extension is called Yontoo. They suck. But you can be sure that I didn’t run a Yontoo installer recently. Something else I installed did me the favor of sliding that sucker onto my machine. Tonight I wrote Yontoo this message:
How can I find out how you [sic] software was installed in my browser? I certainly didn’t ask for it, but obviously at some point when I thought I was installing something else, I got your stuff too. I want to know who to yell at.
Greenpeace has been outspoken recently, denouncing Apple for having inefficient, carbon-spewing data centers. There are worse offenders than Apple, but let’s face it, when the protest is at Apple, more TV cameras show up, and there’s a better chance of making a national story. Also, Apple has certainly had room for improvement in this area. On top of that, as Apple goes, so goes the industry. Directing protests at Apple makes perfect sense if you’re Greenpeace.
For a while now, Yahoo! has been at the top of Greenpeace’s eco-friendly data center list. The guy that built those data centers now works at Apple, and I heard a talk from him yesterday. It was really interesting, and I got the feeling that the environment was important to him personally; that he saw better, cleaner data centers as his legacy.
Mostly I’m going to talk in the abstract here, and when I do mention Apple I’m going to be careful to only say things that I can find in public sources.
I’ve always thought of data centers (warehouses filled with humming computers) as being pretty clean, except for all that dang electricity they suck up. It turns out there are other issues as well, and Greenpeace would do well to broaden the scope of their scrutiny. For instance, modern data centers use a crap-ton of water (that then has to be treated), and they have (literally) tons of lead and sulphuric acid onsite. There’s a bunch of ways besides just consuming electricity that the huge server farms popping up everywhere can hurt the environment.
But let’s start with electricity. There’s no getting around it, computers need the stuff. Data centers are not rated by how much computing power they contain, but by power consumption. Keeping the computers cool is another massive power drain, but it’s WAY better than it used to be. One simple shift made a big difference: cool the computers directly, rather than the room (or even the cabinet) they’re in. Physical changes to allow heat to escape through convection also save a lot of energy. So that’s good news.
Also good news is the efforts of some companies (well, I assume more than one) to provide their own power, onsite, to remove the need for batteries and backup diesel generators. Apple has built a huge fuel-cell plant and a large solar generating farm at its new data center in North Carolina (I’m pretty sure this is where Siri lives). Fuel cells still put out CO2, but Apple is getting their fuel from “biomass” — methane coming out of local garbage dumps. The logic is that putting that gas to use is better than letting it loose in the atmosphere. CO2 bad, CH4 worse.
Now, don’t get all misty-eyed at Apple’s greenness. They do this stuff to make money. If you had a big pile of cash at your disposal, wouldn’t you spend it now to gain immunity from energy price fluctuations in the future? You bet your sweet ass you would. If you can do it in an environmentally responsible way, all the better. (Fuel cells are definitely not the cheapest solution short-term.) But as Apple’s new data centers come on line at a ridiculous rate, Greenpeace is finding less to complain about. And that’s a good thing for everyone. Greenpeace can say, “See? We influenced this giant company and now they’re doing the right thing.” Apple can reply, “We would have done it anyway. It’s good fiscal sense.”
Either way, it’s still a good thing. Although, there’s no getting around the fact that these server farms still use an enormous amount of energy. Even “green” energy puts a burden on the environment — something people seem to forget. So, let’s not get complacent here.
Oh, yeah, and the water thing. Apple’s newest data centers don’t use any. The only burden on the sewer system is the toilet in the office. Take that, Yahoo!
I am mostly happy with the new version of Safari. Mostly. I am also stunned and dismayed that they have removed the support for RSS feeds. Yes, stunned and dismayed.
No more will I have a little notification right in my browser that someone has left a comment here at Muddled Ramblings. And Apple seems to have completely forgotten this use-case: When I read my comics in the morning, some of them have feeds and some don’t. Now, to take advantage of the feeds in some, I’ll have to read the comics in two different apps. (Or, check for the availability in one app and have it switch to my browser to read it, then go back to the previous app for the next comment and so on. Yuck.)
Sure, the Safari implementation of RSS has some issues, but it was right there, where it was most useful.
Something important has happened in the Media Empire!
You see how simple and unobtrusive that is? Not some feed that shows me big blocks of info, just a number in a place I’m likely to notice. Not in some other app that I need to check periodically.
With a heavy sigh this morning I set out once more to find an RSS reader that doesn’t suck. I couldn’t find one. Out of the pile of newsreader apps I waded through, they ALL failed on at least one of these criteria:
Synchronize across my computers without a google reader account. I am NOT giving them a list of the things I subscribe to. The same sentiment applies, with less vehemence, to any that require a subscription to some service out there on the Web. This is what iCloud is supposed to be for.
Built-in Webkit. I should at least be able to see the site without switching back to a browser.
Let me organize feeds and don’t bother me with noise. There are a bunch of ticker-style apps that constantly show the latest from your feeds. Which, if you follow news sites, would be a constant distraction, and I’d be constantly wondering what has gone off the list that I might have been interested in. Gah. Just let me see a compact list of feeds organized how I want them, when I want them.
Note that “Free” is not on the list of requirements. I’d pay (a bit) for something that didn’t suck. I’d especially pay (a bit) for a Safari plugin that put the functionality back where it belonged.
If I didn’t work for Apple, I’d probably be coding something up right now.
For now, I’m giving Vienna a go (nice clean interface, no synchronization) on one computer, and I’m probably going to install Shrook on this machine. If I can stand its interface and lack of built-in page viewing (as far as I can tell from the limited description), it might become my choice.
Update: Shrook was a bust. The synchronization feature required a paid subscription to their service. No promises of better privacy were mentioned. Come on, developers, this is what iCloud is for!
A few weeks ago I wrote about the way secure connections on the Web are set up and why the system as it stands is vulnerable to abuse — or total collapse. I’d like to spend a little time now devoted to specific things we can all do to make the Web safer for everyone. This attempt to turn the ocean liner before it hits the iceberg may well be futile, which will inevitably lead to governments being the guardians of (and privileged to) almost all our private conversations and transactions.
So, I have to try.
Security and privacy are related and a key tool for both is encryption. A piece of data is scrambled up and you need a special key (which is a huge number) to unscramble it. Modern systems use two keys, and when the data is scrambled with one, it can be unscrambled with the other.
When I get a message from Joe, I can use the public half of his pair of keys to unscramble it. If that works, then only someone who has Joe’s secret key could have sent the message. Joe has effectively “signed” the message and I can tell he wrote it and that it hasn’t been tampered with since.
The catch is, if someone gave me a bogus key and said it came from Joe, then all those messages that supposedly came from Joe actually came from someone else. These days most of the certificates (the files that contain the keys) out there are created and confirmed by a handful of companies and governments, and the software we use trusts these certificates implicitly. You are not even asked if you think Comodo is trustworthy, diligent, and none of its subsidiaries has been hacked (which happened), the decision has been made for you.
It is conceivable that we can replace this centralized authority system, but so far it’s not simple. Practically speaking, nothing big is going to change until things are much more obvious. Still, one of the first stepping-stones is in place, so we may as well get that part into common use, which would accelerate the rest of the process.
Here’s my thesis: With technology today, all emails should be signed, and any email to someone you know should also be encrypted. I look forward to the day I can reject all unsigned email, because it will be spam. As a side effect, jerssoftwarehut.com won’t get blacklisted in spam filters because some other company used that address in the “from” field of an email they sent. Email is fundamentally flawed, the big companies are too busy arguing about how to fix it, and it’s time to do it ourselves.
How do we get to this happy place? It’s actually pretty simple. It takes two steps: create a pair of keys for yourself and turn on S/MIME in your email program. If everyone did those things, the Internet world would be a much happier place. Plus, once we all have our keys, the next phase in revamping Web security, building the Web of Trust, will be much simpler (once the software manufacturers realize people actually want this — another reason we should all get our keys made).
If it’s so easy, why isn’t everyone doing it already?
All the major email programs support S/MIME, but they don’t seem to think that ordinary folks like you and me want it. All the documentation and tools are aimed at corporate IT guys and other techno-wizards.
I’m going to go through the process in general terms, then show specific steps for the operating system I know best. I borrowed from several articles which are listed at the bottom, but my process is a little different.
Step 1: Get your keys. Some of the big Certificate Authorities offer free keys, and while that route is probably easier and absolutely addresses our short-term goals, it does nothing to address the “what if the CA system breaks?” problem. So, for long-term benefits, and getting used to our new “I decide whom I trust” mentality, I recommend that we all generate our own certificates and leave the central authority out of it.
The catches in Step 1:
It’s not obvious how one generates a key in the first place, gets it installed correctly, and copies the key to all their various devices.
For Windows, it may depend on what software you use to read your email. Here’s an article for Mozilla (Firefox and Thunderbird): Installing an SMIME Certificate.
For Mac, read onI’ll be publishing instructions soon.
I’ve read (but not confirmed) that Thunderbird (the Mozilla email app) requires that certificates be signed by a CA.
You can create your own CA – basically you just make your certificate so it says “Yeah, I’m a Certificate Authority”.
If I know you personally, you can use my CA, which I created just yesterday for my own batch of certificates. If you’re interested let me know and I’ll tell you how. It’s pretty simple.
When you generate your own keys, they won’t be automatically trusted by the world at large. That’s the point. The people you interact with will have to decide whether to trust your certificate. In the near term, this could be a hassle. It’s something people just haven’t had to deal with before. You can:
Educate them, get them on board, and not worry too much if people get an “untrusted signature” message and don’t know what to do about it. That way they’ll at least notice there’s a signature at all.
For all those catches, there’s an alternative: go back to using a trusted Certificate Authority like Comodo to generate your certificate, and at least get used to signing and encrypting everything. Maybe later you can switch to a self-signed certificate.
Ironically, in the case of these free certificates from the big companies, they’re probably less trustworthy than one you generate yourself. All the CA confirms is that they sent the cert to the associated email address after they made it. But, our software trusts them for better or worse, and if that makes adoption of secure communication happen faster, then I’m good with that.
The catches in Step 2:
Really, there aren’t any. Somewhere in the preferences of your email reader you can turn on S/MIME (on Mac, installing your certificate seems to do that). You can probably set it to sign everything — and you should. The next step is to learn how to interact with the signed messages you receive. Do you trust the signature? (Don’t take this lightly – if possible confirm the email you got through another means. You only have to do this once.) If so, you can tell your computer and it will save your friend’s public key. Now you can send an encrypted message back to that person, and they’ll be able to trust your key, too. Between you two, you’ll never have to think about it again. Your communications will simply be secure, with no added effort at all.
Note:
I intended to put the step-by-step instructions for Mac here, but it’s a beautiful Sunday afternoon and even though I’m sitting outside, I have the urge to go do something besides type technical stuff into a computer, prepare a list of references, and all that stuff. So, that will have to wait a day or two. It’s time to let this episode run free!
As the Information Age plunges on, we find the definition of “neighbor” changing. We have our geographic neighbors, but more and more our closest neighbors are people who might be thousands of miles away. It’s kind of cool.
One of the great things about neighbors is that they watch out for you. When bad things happen, your neighbors are there to help. The people who live near my house seem like a good bunch; ol’ George sits at the top of the list (based on charisma) but Lois is not far behind. If they need a hand I’ll give it, no questions asked.
I’d like to extend that to my online neighbors. I have a big-ass hard drive (well, medium-ass) and I can back you up. CrashPlan makes it easy and it’s free. Your data will be strongly encrypted so I can never figure out what it is I’m backing up for you. But if a meteor (or a power surge) strikes your home, at least your data will be safe.
Don’t think too hard about this. Just say, “Yeah, Jer, I wouldn’t mind having my most important stuff backed up outside these walls.” There’s really no reason not to.
Since there are others using my server now, I thought it would be a good idea to upgrade my backup practices. I looked around a bit, hoping for a solution that was free, butt-simple to set up, and automatic, so I would never have to think about it again. I don’t like thinking when I don’t have to.
I came across CrashPlan, the backup solution my employer uses. Turns out their software is free to chumps like me; they make their cash providing a place for you to put that valuable information.
There are two parts to any backup plan: you must gather your data together and you must put it somewhere safe that you can get to later. The CrashPlan software handles the gathering part, making it easy, for instance, to save all my stuff to the external hard drive sitting on my desk, but if the house burns down that won’t do me much good.
Happily CrashPlan also makes it easy to talk to remote computers, provided they have the software installed. I put CrashPlan on my server in a bunker somewhere in Nevada, and now this site and a couple of others are saved automatically to my drive in California as well. Easy peasy! Any computer signed up under my account can make backups to any other.
But wait! There’s more! The cool idea CrashPlan came up with was letting friends back each other up. I give you a special code and you can put backups of your stuff on my system. I can’t see what you saved, it’s all encrypted. But unless both our houses burn down at the same time, there’s always a safe copy.
Sure, if you pay you get more features and they will store your stuff in a safe place where you don’t have to wait if I happen to be on vacation, but for free that’s not bad at all. The idea of friends getting together and forming a backup community appeals to me as well. It’s a great way for geeks to look out for one another.
Getting Apache, PHP, and MySQL installed and talking to each other is pretty simple — until something doesn’t come out right. This guide takes things one step at a time and checks each step along the way.
NOTE: At this moment (November 4, 2017), some of the file paths given below are out-of-date. The new organization is better, but until I have a chance to verify the new stuff, you may have to do a little poking around to find what you’re looking for.
The good new is that because of the changes, you may not need this guide anymore, but I’ll update it when I get a chance to do a new install, just to keep my own head on straight.
March 8, 2016 (added 'select' during php install)
March 8, 2016
Using MacPorts to build a LAMP server from scratch
About this tutorial:
There are other step-by-step guides out there, and some of them are pretty dang good. But I’ve never found one that I could go through and reach the promised land without a hitch. (Usually the hitches happen around MySQL.) Occasionally key points are glossed over, but I think mostly there are things that have changed, and the tutorials haven’t updated. Now however I’ve done this enough times that there are no hitches anymore for me. Since MacPorts occasionally changes things, I’ll put up at the top of this page the last time this recipe was last used exactly as written here.
This guide breaks things down into very small steps, but each step is simple. I include tests for each stage of the installation, so problems can be spotted while they're easy to trace. We get each piece working before moving on to the next. I spend a little time telling you what it is you accomplish with each step, because a little understanding can really help when it’s time to troubleshoot, and if things are slightly different you have a better chance of working through them.
Audience: This guide is designed to be useful to people with only a passing familiarity with the terminal. More sophisticated techno-geeks may just want to go through the sequence of commands, and read the surrounding material only when something doesn't make sense to them. The goal: follow these steps and it will work every damn time.
MacOS X versions: Tiger, Leopard, Snow Leopard, Lion. Maybe others, too. The beauty of this method is it doesn’t really matter which OS X version you have.
The advantages of this approach
There are multiple options for setting up a Mac running OS X to be a Web server. Many of the necessary tools are even built right in. Using the built-in stuff might be the way for you to go, but there are problems: It’s difficult to customize (Search on install apc Mac and you’ll see what I mean), you don’t control the versions of the software you install, and when you upgrade MacOS versions things could change out from under you.
Also simple to set up is MAMP, which is great for developing but not so much for deployment. For simple Web development on your local machine, it’s hard to beat.
But when it comes right down to it, for a production server you want control and you want predictability. For that, it’s best to install all the parts yourself in a known, well-documented configuration, that runs close to the metal. That’s where MacPorts comes in. Suddenly installing stuff gets a lot easier, and there’s plenty of documentation.
Holy schnikies! A new timing exploit on OpenSSL! It may be months before Apple's release fixes it. I want it sooner!
What you lose:
If you’re running OS X Server (suddenly an affordable option), you get some slick remote management tools. You’ll be saying goodbye to them if you take this route. In fact, you’ll be saying goodbye to all your friendly windows and checkboxes.
Also, I have never, ever, succeeded in setting up a mail server, MacPorts or otherwise, and I’ve tried a few different ways (all on the same box, so problems left over from one may have torpedoed the next), and no one I've ever met, even sophisticated IT guys, likes this chore. If serving mail is a requirement, then OS X Server is probably worth the loss of control. Just don’t ever upgrade your server to the next major version. (Where’s MySQL!?! Ahhhhhh! I hear frustrated sys admins shout.)
So, here we go!
Document conventions
There are commands you type, lines of code you put in files, and other code-like things. I've tried to make it all clear with text styles.
This is something you type into the terminal
Do not type the ; it's just to represent the prompt in your own terminal window. Once you've typed the text (or pasted it in from here), hit return.
This is a line of code in a file.
Either you will be looking for a line like this, or adding a line like this.
This is a reference to a file or a path.
Prepare the Box
Turn off unneeded services on the server box. Open System Preferences and select Sharing.
turn on remote login
(optional) turn on Screen Sharing
Turn off everything else - especially Web Sharing and File Sharing
Install XCode. This provides tools that MacPorts uses to build the programs for your machine. You can get XCode for free from the app store. It’s a huge download. Note that after you download it, you have to run the installer. It may launch XCode when the install is done, but you can just Quit out of it. Lion and Mountain Lion require an extra step to install the command-line tools that MacPorts accesses.
Install MacPorts. You can download the installer from http://www.MacPorts.org/install.php (make sure you choose the .dmg that matches the version of MacOS you are running). Run the installer and get ready to start typing.
Now it’s time to make sure MacPorts itself is up-to-date. Open terminal and type
sudo port selfupdate
password: <enter your admin password>
MacPorts will contact the mother ship and update itself.
If you're not familiar with sudo, you will be soon. It gives you temporary permission to act as the root user for this machine. Every once in a while during this process you will need to type your admin password again.
May as well get into the habit of updating the installed software while we’re at it. Type
sudo port upgrade outdated
and you will most likely see a message that looks like an error but really says that there was nothing to upgrade. No biggie.
Make a habit of running these commands regularly. One of the reasons you're doing this whole thing is to make sure your server stays up-to-date. This is how you do it.
Install Apache
Now it’s time to get down to business. All the stuff we’ve installed so far is just setting up the tools to make the rest of the job easier. Let’s start with Apache!
sudo port install apache2
This may take a little while. It’s actually downloading code and compiling a version of the server tailored to your system. First it figures out all the other little pieces Apache needs and makes sure they’re all installed correctly. Hop up and grab a sandwich, or, if you're really motivated, do something else productive while you wait.
When the install is done, you will see a prompt to execute a command that will make Apache start up automatically when the computer is rebooted. Usually you will want to do this. The command has changed in the past, so be sure to check for the message in your terminal window. As of this writing, the command is:
sudo port load apache2
Create an alias to the correct apachectl. apachectl is a utility that allows you to do things like restart Apache after you make changes. The thing is, the built-in Apache has its own apachectl. To avoid confusion, you can either type the full path to the new apachectl every time, or you can set up an alias. Aliases are commands you define. In this case you will define a new command that executes the proper apachectl.
In your home directory (~/) you will find a file called .profile - if you didn’t have one before, MacPorts made one for you. Note the dot at the start. That makes the file invisible; Finder will not show it. In terminal you can see it by typing
ls -a ~/
You will get back a list of all the files in your home directory, including the hidden ones that start with ..
Edit ~/.profile and add the following line:
alias apache2ctl='sudo /opt/local/apache2/bin/apachectl'
Edit how? See below for a brief discussion about editing text files and dealing with file permissions.
~/.profile isn't the only place you can put the alias, but it works.
You need to reload the profile info for it to take effect in this terminal session.
source ~/.profile
Now anywhere in the docs it says to use apachectl, just type apache2ctl instead, and you will be sure to be working on the correct server.
Start Apache:
apache2ctl start
You might see a warning or two, probably a notification about the server's name. That's fine.
Test the Apache installation. At this point, you should be able to go to http://127.0.0.1/ and see a simple message: “It works!”
MILESTONE - Apache is up and running!
Install PHP
Use MacPorts to build PHP 5:
sudo port install php56-apache2handler
Time passes and I don't always update the php version number. At this moment the latest php version is 5.6, so you use php56 everywhere. If you want to install php 7.0, you would use php70. You get the idea.
MacPorts will know it needs to install php56 before it can install the apache2 stuff.
You could install the MySQL extensions to PHP now (sudo port install php56-mysql), but that will cause MySQL to be installed as well. It’s no biggie, but I like to make sure each piece is working before moving on to the next. It makes problem-solving a lot easier. So, let’s hold off on that.
Choose your php.ini file. There are a couple of different options that trade off security for convenience (error reporting and whatnot). As of this writing there is php.ini-development (more debugging information, less secure) and php.ini-production. Copy the one you want to use and name it php.ini:
You will be editing this file a little bit later, but mostly it’s just a bunch of settings you’ll never need to understand.
Test the PHP install
On the command line, type
php56 -i
A bunch of information will dump out. Hooray!
Make your new php the default. This will allow you to run scripts from the command line just by typing 'php', rather than having to specify 'php56'.
On the command line, type
sudo port select --set php php56
Test this by typing
which php
You will see /opt/local/bin/php, which is where MacPorts keeps a pointer to the version you specified.
Now it’s time to get Apache and PHP talking to each other. Apache needs to know that PHP is there, and when to use it. There’s a lot of less-than-ideal advice out there about how to do this.
httpd.conf is the heart of the Apache configuration. Mess this up, Apache won’t run. It’s important, therefore, that you MAKE A BACKUP (there’s actually a spare copy in the install, but you never rely on that, do you?)
cd /opt/local/apache2/conf
sudo cp httpd.conf httpd.conf.backup
First run a little utility installed with Apache that supposedly sets things up for you, but actually doesn’t do the whole job:
cd /opt/local/apache2/modules
sudo /opt/local/apache2/bin/apxs -a -e -n php5 mod_php56.so
The utility added the line in the Apache config file that tells it that the PHP module is available. It does not tell Apache when to use it. There is an extra little config file for that job, but it’s not loaded (as far as I can tell), and it’s not really right anyway. Let's take matters into our own hands.
It won't let me save! See below for a brief discussion about editing text files and dealing with permissions.
Time to edit! Open /opt/local/apache2/conf/httpd.conf with permission to edit it. We need to add three lines; one to tell it that PHP files are text files (not strictly necessary but let’s be rigorous here), and two lines to tell it what to do when it encounters a PHP file.
Search for the phrase AddType in the file. After the comments (lines that start with #) add:
AddType text/html .php
Search for AddHandler (it’s just a few lines down) and add:
AddHandler application/x-httpd-php .php
AddHandler application/x-httpd-php-source .phps
The second of those is just to let you display PHP source code in a Web page without actually running it.
Finally, we need to tell Apache that index.php is every bit as good as index.html. Search in the config file for index.html and you should find a line that says DirectoryIndex index.html. Right after the html file put index.php:
Before:
DirectoryIndex index.html
After:
DirectoryIndex index.html index.php
(Optional) As long as we’re in here, let’s make one more change for improved security. Search for the line that specifies the default options for Apache and remove Indexes:
Before:
Options Indexes FollowSymLinks
After:
Options FollowSymLinks
This prevents outsiders from seeing a list of everything in a directory that has no index file.
Save the file.
Check the init file syntax by typing
/opt/local/apache2/bin/httpd -t
You will probably get a warning about the server’s name again, but that’s OK, as long as you see the magical Syntax OK message. If there is an error, the file and line number should be listed.
Restart Apache:
apache2ctl restart
Test whether PHP and Apache can be friends. We will modify the “It Works!” file to dump out a bunch of info about your PHP installation.
Currently the default Apache directory is /opt/local/apache2/htdocs
Start by renaming index.html to index.php:
cd /opt/local/apache2/htdocs
sudo mv index.html index.php
Edit the file, and after the It Works! bit add a PHP call so the result looks like this:
<html>
<body>
<h1>It works!</h1>
<?php echo phpinfo(); ?>
</body>
</html>
Save the file
Go to http://127.0.0.1 - you should see a huge dump of everything you wanted to know about your PHP but were afraid to ask.
MILESTONE - Apache and PHP are installed and talking nice to each other.
Install and configure MySQL
Use MacPorts to install MySQL database and server and start it automatically when the machine boots:
sudo port install mysql55-server
sudo port load mysql55-server
Now we get to the trickiest part of the whole operation. There's nothing here that's difficult, but I've spent hours going in circles before, and I'm here so you won't find yourself in that boat as well. MySQL requires some configuration before it can run at all, and it can be a huge bother figuring out what’s going on if it doesn’t work the first time. We start by running a little init script:
As with Apache, you can create a set of aliases to simplify working with MySQL. There are some commands you will run frequently; things get easier if you don’t have to type the full path to the command every time. Open up ~/.profile again and add the following three lines:
alias mysqlstart='sudo /opt/local/share/mysql55/support-files/mysql.server start'
alias mysql='/opt/local/lib/mysql55/bin/mysql'
alias mysqladmin='/opt/local/lib/mysql55/bin/mysqladmin'
#TEMPORARY addition to the path so the next step will work
export PATH=/opt/local/lib/mysql55/bin:$PATH
When you're done, save and
source ~/.profile
Next we need to deal with making the database secure and setting the first all-important password. The most complete way to do this is running another utility that takes you through the decisions.
The script offers to delete some test users and databases that in my experience are totally useless anyway. Take the advice offered and get rid of all that junk.
Remember the password you set for the root user!
You now have a MySQL account named root which is not the same as the root user for the machine itself. When using sudo you will use the machine root password (as you have been all along), but when invoking mysql or mysqladmin you will enter the password for the database root account.
As with PHP above, MySQL has example config files for you to choose from. The config file can be placed in a bunch of different places, and depending on where you put it, it will override settings in other config files. If you follow this install procedure, you don’t actually need to do anything with the config files; we’ll just be using the factory defaults. But things will work better down the road if you choose a config that roughly matches the way the database will be used.
Find where the basedir is. As of this writing it’s /opt/local, and that’s not likely to change anytime soon, but why take that for granted when we can find out for sure? Let's make a habit of finding facts when they're available instead of relying on recipes like this one.
mysqladmin -u root -p variables
password: <enter MySQL root user's password>
A bunch of info will spew across your screen. At this moment, there are two interesting nuggets: basedir and socket. Make a note of them for later.
Now it’s time to choose which example config file you want to start with. The examples are in /opt/local/share/mysql55/support-files/, and each has a brief explanation at the top that says what circumstances it’s optimized for. You can read those, or just choose one based on the name. If you have no idea how big your database is going to be, medium sounds nice. You can always swap it out later.
Fill in <basedir> with the basedir you learned in the previous step.
Test MySQL
On the command line, type
mysql -u root -p
password: <enter MySQL root user's password>
and enter the MySQL root user password when prompted. No errors? Cool. We’re done here. Type
exit
at the prompt.
MILESTONE - MySQL server is running and happily talking to itself.
Teach PHP where to find MySQL
The database is up and running; now we need to give PHP the info it needs to access it. There's a thing called a socket that the two use to talk to each other. Like a lot of things in UNIX the socket looks like a file.
The default MySQL location for the socket is in /tmp, but MacPorts doesn’t play that way. There are a couple of reasons that /tmp is not an ideal place for the socket anyway, so we’ll do things the MacPorts way and tell PHP that the socket is not at the default location. To do this we edit /opt/local/etc/php56/php.ini.
There are three places where sockets are specified, and they all need to point to the correct place. Remember when you saved the socket variable from MySQL before? Copy that line and then search in your php.ini file for three places where is says default_socket:
pdo_mysql.default_socket = <paste here>
. . .
mysql.default_socket = <paste here>
. . .
mysqli.default_socket = <paste here>
In each case the whatever = part will already be in the ini file; you just need to find each line and paste in the correct path.
While we’re editing the file, you may want to set a default time zone. This will alleviate hassles with date functions later.
Finally, we need to install the PHP module that provides PHP with the code to operate on MySQL databases.
sudo port install php56-mysql
Restart Apache:
apache2ctl restart
Test the connection.
Typing
php56 -i | grep -i 'mysql'
Should get you a list of a few mysterious lines of stuff.
Second test: The whole bag of marbles. You ready for this?
In the Apache’s document root (where the index.php file you made before lives), create a new file named testmysql.php
DELETE THE FILE. It's got your root password in it!
sudo rm /opt/local/apache2/htdocs/testmysql.php
MILESTONE - Apache, PHP, and MySQL are all working together. High-five yourself, bud! You are an IT God!
Set up virtual hosts.
Finally, we will set up virtual hosts. This allows your server to handle more than one domain name. Even if you don't think you need more than one domain, it's a safe bet that before long you'll be glad you took care of this ahead of time.
We will create a file that tells Apache how to decide which directory to use for what request. There is an example file already waiting for us, so it gets pretty easy.
Tell Apache to use the vhosts file. To do this we make one last edit to httpd.conf. After this, all our tweaks will be in a separate file so we don’t have to risk accidentally messing something up in the master file.
In /opt/local/apache2/conf/httpd.conf, find the line that says
#Include conf/extra/httpd-vhosts.conf
and remove the #.
The # told Apache to ignore the include command. Take a look at all those other files it doesn’t include by default. Some of them might come in handy someday...
Save the file and restart Apache - the warnings you see will make sense soon.
Forbidden! What the heck!?! Right now, that's actually OK. The vhosts file is pointing to a folder that doesn't exist and even if it did it would be off-limits. All we have to do is modify the vhosts file to point to a directory that actually does exist, and tell Apache it's OK to load files from there.
Before going further, it's probably a good idea to figure out where you plan to put the files for your Web sites. I've taken to putting them in /www/<sitename>/public/ - not through any particular plan, but this gives me full control over permissions if I should ever need to chroot any of the sites. The Apple policy of putting sites in User can be useful, but really only if you plan to have one site per user. Otherwise permissions get tricky. The public part is so you can have other files associated with the site that are not reachable from the outside.
Set up the default host directory
Open /opt/local/apache2/conf/extra/httpd-vhosts.conf for editing.
You will see two example blocks for two different domains. Important to note that if Apache can’t match any of the domains listed, it will default to the first in the list. This may be an important consideration for thwarting mischief.
The examples provided in the file accomplish one of the two things we need to get done — they tell Apache what directory to use for each domain, but they do nothing to address what permissions Apache has in those directories. A lot of people put the permissions stuff in the main httpd.conf, but why not keep it all in one place and simplify maintenance while we reduce risk?
Here's an example:
<VirtualHost *:80>
ServerAdmin you@your.email.com
DocumentRoot "/www/sitename/public"
ServerName sitename.com
ServerAlias www.sitename.com
ErrorLog "logs/sitename-error_log"
CustomLog "logs/sitename-access_log" common
<Directory "/www/sitename/public">
Options FollowSymLinks
AllowOverride None
Order allow,deny
Allow from all
</Directory>
</VirtualHost>
You can see where it sets what directory to go to, where it says to treat www.mydomain.com the same as mydomain.com, and then in the Directory block it sets permissions. The actual permissions instructions are pretty arcane. The most important thing to note is the line
AllowOverride none
This is not typical, but it's better, as long as you don't forget you did it.
Here's the skinny: A lot of web apps like WordPress and Drupal need to set special rules about how certain requests are handled. They use a file called .htaccess to set those rules. By setting AllowOverride none you're telling Apache to ignore those files. Instead, you can put those rules right in the <Directory> blocks in your vhosts file. It saves Apache the trouble of searching for .htaccess files on every request, and it's a more difficult target for hackers. .htaccess is for people who don't control the server. You do control the server, so you can do better.
If others will be putting sites on the server and you don't want them fiddling with the config files, you can allow .htaccess to override specific parameters. Read up in the Apache docs to learn more.
If you are using SSL, you also need to set up a VirtualHost entry for port 443. That entry will also include the locations of the SSL certificates.
Add further blocks that match the domains you will be hosting.
Restart Apache and test your setup. http://127.0.0.1 should go to your default directory. Testing the domains is trickier if you don’t have any DNS entries set up for that server. I’ll write up a separate document about using /etc/hosts to create local domains for this sort of test.
MILESTONE - You have done it. A fully operational LAMP environment on your Mac, suitable for professional Web hosting.
(Optional) Install phpMyAdmin
phpMyAdmin makes some database operations much easier. There have been security issues in the past, so you might reconsider on a production machine, but on a development server it can be a real time saver.
sudo port install phpMyAdmin
Update your Virtual Hosts with the domain you want to use to access phpMyAdmin, which is by default at /opt/local/www/phpmyadmin/
test - log in as root.
Configure - configuring phpMyAdmin fills me with a rage hotter than a thousand suns. It just never goes smoothly for me, whether I use their helper scripts or hand-roll it while poring over the docs. Maybe if I do it a few more times I’ll be ready to write a cookie-cutter guide for that, too. In the meantime, you’re better off getting advice on that one elsewhere.
Wrapping Up
I hope this guide was useful to you. I'm he kind of guy who learns by doing, and I've made plenty of mistakes in the past getting this stuff working. Funny thing is, when it goes smoothly, you wonder what the big deal was. Hopefully you're wondering that now.
If you find errors in this guide, please let me know. Things change and move, and I'd like this page to change and move with them.
Keep up to date: One of the big advantages of this install method is that updates to key software packages get to your server faster. Use that power. Run the update commands listed in step one regularly.
In the UNIX world, access to every little thing is carefully controlled. There's only one user who can change anything they want, and that user is named root.
When you log in on a Mac, you're not root, and good thing, too. But as an administrator, you can temporarily assume the root role. You do this by preceding your command with sudo. (That's an oversimplification, and you will have earned another Geek Point when you understand why. In the meantime, just go with it. sudo gives you power.)
When you use sudo, you type your password and if the system recognizes you as an administrator it will let you be root for that command.
For convenience, you only have to type your password every five minutes, but you do need to repeat 'sudo' for each command.
Just remember, as root you can really mess things up.
Jerry told me to edit the file, you lament, but he didn't say how. Kind of strange, considering the minute detail of the rest of the guide. The thing is, there's not one easy answer.
Let's start with the two kinds of text editors. There are editors like vim and pico that run right in terminal. They are powerful, really useful for editing files on a remote box, and if you know how to use them you're not reading this footnote. The other option is a windowed plain-text editor. TextEdit is NOT a plain-text editor. There are a lot of plain-text editors out there, and they all have their claims to fame. You can use any of them to edit these files.
Whoops! That brings us to the gotcha: permissions. In UNIX, who can change what is tightly controlled. Many of the files we need to edit are owned by root, the God of the Machine, so we need to get special permission to save our changes. Many of the plain-text editors out there will let you open the file, but when it comes time to save... they can't. You don't have permission.
Some editors handle this gracefully, however, and let you type your admin password and carry on. BBEdit and its (free) little brother TextWrangler give you a chance to type your password and save the file. I'm sure there are plenty of others that do as well.
BBEdit and TextWrangler also allow you to launch the editor from the command line, so where I say above edit ~/.profile, you can actually type edit ~/.profile and if you have TextWrangler installed, it will fire right up and you'll have taken care of the permissions issue. (If you decided to pay for BBEdit, the command is bbedit ~/.profile.) I'm sure there are plenty of other editors that do that too.
I'm really not endorsing BBEdit and TextWragler here; they just happen to be the tools I picked up first. Over time I have become comfortable with their (let's call them) quirks. Alas, finding your text editing answer is up to you. If you're starting down this path, it's only a matter of time before you pick up rudimentary vim or pico skills; eventually you'll be using your phone to tweak files while you're on the road. It's pretty empowering. But is now the time to start learning that stuff? Maybe not. It's your call.
I’ve had a bit of a tangle with Adobe recently. When it comes right down to it, their Web site makes it very difficult to find what you’re looking for, or even to figure out what product is best for you. This has led to a few frustrating days of going around in circles, trying to find someone to help me rectify a mistake caused by the “click Mac and get Windows” feature of the site.
This is apparently a pretty common problem for people to have, and there are instructions telling just what to do about it. Much of the time the instructions are not very helpful, however. After a day of futility I decided that I would do whatever it took to get a human on the line.
Easier said than done. For instance, the “Schedule a callback for another time” feature invariably returns with the message “No immediate callback available. Try again later.” I thought maybe the more-secure settings in Safari were causing a problem, so I tried again with Firefox. Same result.
Finally I connected by chat with a nice guy who was not empowered to execute the obvious, simple, and immediate solution to the problem. We had to do it the hard way.
Somewhere during my latest futile rummaging around on the site (“Click here for instructions”, then the instructions saying to go right back where you were, and so forth), a window popped up asking if I wanted to answer some questions about my experience.
You’re damn skippy I wanted to answer some questions. When my latest exercise in circular navigation was complete, the survey came up. “Neutral third party,” I was assured. “No specific identity info recorded.” I took the survey, being sure to give credit in the few places it was due. I answered the essay questions with specifics. In the end, I clicked ‘submit’.
“System not working at this time,” the message said.