My favorite camera lens is a marvel of technology, an almost perfect example of science serving art. But lately my imagination has been captured by the other end of the lens spectrum: the pinhole.
The idea took root when I saw some russian plastic pinhole lens go on ebay for actual money. The sales pitch was, “recreate the look of this crappy old camera with your modern DSLR!” I agreed that would be a fun thing to do. We put distortion into electric guitar pickups and we dig lo-fi pictures.
But that’s selling the pinhole short. Last night I experimented with the lenses in my stable, determining the smallest details I could hope to resolve. I don’t have a true macro lens, but here’s the thing. A really good macro lens (hundreds or even thousands of dollars) will give you the ability to project images onto your film or digital sensor at a 1:1 ratio – if the thing you’re photographing is 1cm, it will be 1cm on your sensor. With a modern camera, that translates to a whole bunch of pixels.
But wait! With a pinhole, at the cost of maybe two dollars (10 bucks for better image quality) you can get a magnification five times that. Obviously not with the same fidelity, but seriously, five times the magnification means that you can still resolve some amazing details in your subject.
I think a pinhole would also be a better lens for observing the sun than any I currently have in my arsenal.
All that on top of cool vintage-looking shots in the “normal” range. Your subject has to be able to hold still for a while; the pinhole allows much less light through than a typical glass lens. You could argue that the primary function of the glass in lenses is to allow you to have a much bigger pinhole and still be able to focus.
And here’s a fun fact: All those numbers that we use when talking about a lens are actually based on pinholes. When we say a lens has a 50mm focal length, what we mean is that it acts like a pinhole 50mm from the film. The other numbers are similarly derived.
For a given focal length, there is an ideal pinhole size. (OK, that’s not exactly true, but there is an ideal pinhole size to optimize the shot for different preferences.) The goal is to have the light that comes from a specific point on the subject strike a particular point on the sensor. As you can probably imagine, the smaller the pinhole, the smaller the dot of light on the sensor from any given spot on the subject. (This dot is called, rather poetically, the “circle of confusion”.)
So the smaller the better, right?
Not so fast, Sparky! Just when you least expect it, light starts behaving like a wave, and the smaller the pinhole, the more pronounced that effect becomes, until diffraction causes the light from that single point outside the lens to turn into a bright central dot surrounded by fainter rings. The trick then is to minimize the distortion caused by both a too-big and a too-small pinhole, and find the happy balance. Others, happily, have done the math, though they don’t all agree.
I have a plan. I’m going to create two pinholes of different sizes, and mount them on the kind of cap you put on your camera body when you don’t have a lens on it. The caps are already made to attach the same way the manufacturers lenses do. I also intend to make an extension tube that mates with the camera at one end and with a lens cap at the other (using the cap that goes on the back of lenses for storage), and have myself a macro/zoom pinhole. The little pinhole can either go directly on the camera for a 46mm focal length, while the larger pinhole one goes on the end of the tube for telephoto. With the small pinhole on the extension tube, you’re ready for serious macro photography.
I’m fascinated now by the question, “what can a really well-engineered pinhole accomplish?” Besides just getting the size of the hole right, there are the challenges of getting the hole nice and round (irregularities will play hell with diffraction) and shallow. If the hole is too deep (drilled through too thick of material) the corners of the picture are cut off. The camera will quite literally have tunnel vision.
I intend to spend some hours in Father-of-Sweetie’s workshop, experimenting with drilling holes in metal. (I priced out copper sheet and then realized that drilling holes in money (pennies) would be much cheaper.) The first thing to discover is whether it’s merely difficult or completely friggin impossible to get a drill to stop when its tip is 0.09mm through the metal (for the smaller hole, assuming the standard 118º point angle of the drill’s tip), and if the resulting hole is round enough. If not, then micro drills are going to be required.
While I don’t mind spending a great deal of time building the thing, I’d like to come up with a process that can be repeated fairly easily. Because if people are willing to pay for a little plastic piece of poo, there might be a group of hobbyists interested in the Ridiculously Over-Engineered Pinhole System. If I can drill the holes efficiently, it might make a nice little cottage industry.
Bonus!
In between the time of writing and the time of posting, there was a time of doing! Here are some results with Quick and Dirty Pinhole 2 (pinhole 1 didn’t pass quality checks):
-

-
First shot with QDPH-2
-
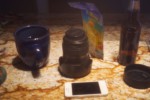
-
Still life with odds and ends
-
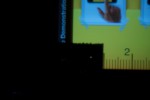
-
First Macro shot with QDPH-2
-

-
Count the pixels of the iPhone retina display!
-

-
QDPH-1 not quite a circle
-
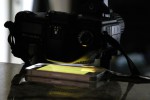
-
Getting in REAL close
A few notes:
What I set out to do this morning was discover if I had any way to measure the size of the pinholes, and to see if they were actually round. I don’t have a fancy loupe, and the ones that can measure down to things that tiny are quite expensive. I do have a camera, however, and I figured if I could get close enough I could use an image to measure the size and shape of the pinhole.
I made a couple of pinholes in tinfoil. I used my fisheye lens to get down as close as I could to the pinholes (laid on top of a ruler app on my phone) and was able to roughly estimate their size. The first was definitely too big, the second seemed only a little bit too big. So I drilled a hole in a Canon body cap and taped in Quick and Dirty Pinhole 2.
Most of the exposures you see here are thirty seconds, at pretty high ISO to boot. the f-number for QDPH-2 is something like 48mm/0.3mm ≈ f/150. Remember how giddy I was to get a lens that went to f/1.2? Yeah, this is the opposite of that. Such is the way of the pinhole. The side effect of that is that just about everything in the universe will be in focus, including things that are really really close.
Yep, the best tool I have for measuring pinholes is… a pinhole, and the marks on the measuring stick are the pixels of the retina display itself (12.8/mm). I am stoked.
In the last macro shot of QDPH-1, you see some ghosting. I’m pretty sure that was caused by light bouncing back and forth between the two pieces of aluminum foil. In shots of the display only, there is no ghosting.
But, my sweetie asked this morning, what’s the point of all this? My answer: It’s fun, and also I think we can get some great vintage-feeling shots. As you can see in the still life, the focus is pretty soft – not appropriate for all the hard-edged items in the shot. I’ll be taking some self-portraits later to see how that goes.
 2
2
Sharing improves humanity:


