Alternative Listerine

A few months ago the Official Sweetie of Muddled Ramblings and Half-Baked ideas and I were looking for a good mouthwash that was not made by a company that engages in animal testing. There are a lot out there, actually, but the trouble is that none of them left our mouths feeling clean the way Listerine did. Listerine feels potent, whether of not it actually is; there’s no substitute for that alcohol bite.

I had always imagined that Listerine was more… sciency that what it turns out to be. There’s the whole American Dental Association endorsement and all that. But it turns out that Listerine comes from the heyday of Snake Oil medicine, and was first marketed as a surgical disinfectant. It was almost certainly better than nothing, which is what most surgeons used back then.

But the thing is Listerine is just a combination of water, grain alcohol, and some essential oils like menthol and thymol. All the ingredients are easily purchased.

OSMRHBI realized that if no one else was making the right mouthwash, that she could just make her own, and tweak the essential oils to better suit our tastes. (This is one of her Superpowers, to say “fine, I’ll make my own.”) It took a couple of iterations to dial in the recipe, but now I would never go back. Our home-brewed version is simply the best mouthwash I’ve ever used.

Is it as effective? I’m not sure how to measure that, considering Listerine’s efficacy claims are maybe not all that scientific either.

It makes smooching better, though, I can promise you that.

1

Je suis encore avec l’accord

Francophiles, please pardon me if the machine didn’t translate the title idiomatically, but that’s about what I would have said back in the days I was more facile with French. So it represents me. And, I have to say, it reads really well.

I am still with the Paris Accord. I will reduce my carbon footprint 25%, and I will do it long before 2025.

When it comes to carbon (and other greenhouse gasses), almost every American is in the top 1%. Because I live in a temperate climate, my greenhouse gas production is low for an American, but that doesn’t exempt me from doing what I can β€” directly, measurably β€” to reduce the damage I do. Our government has abdicated its responsibility, but that doesn’t mean we can’t step up as individuals.

Fuck Washington.

If I want to reduce the harm I cause, I have to know: Where do I produce the most greenhouse gasses?

Gasoline, of course. That’s a big one. Beef, sadly, is another. Methane. I read today that Chicken is less greenhouse-gassy, as is fish. (As I type this I’m listening to the neighbor’s chickens.) Heating and Air Conditioning are a factor, even here. And then there’s just stuff. Buying things I don’t need packaged in materials that never die. Also, almost everything I use consumes electricity, and around here that mostly comes from natural gas.

It’s kind of too bad they couldn’t get nuclear right. We’ve traded the potential localized disaster of a nuke plant popping with the guaranteed global disaster of coal-generated power.

But mostly for me it’s food and transportation. And stuff. Which leads to my max-hippie-point morning:

I was delighted as I rode my bike to work today to see a farmer’s market setting up in a parking lot I ride through. An excuse to sleep an extra 30 minutes on Fridays, so it will be open when I pass through. How the veggies fare after a 15-mile ride home will have to be determined.

At the other extreme:

As soon as I get back from my 3000-mile road trip this summer, I’ll definitely cut back on the miles I drive. Definitely. Hey, I’ve got until 2025, right?

1

Make Your Own Tilt Lens!

I first became aware of tilt lenses when I stumbled across the site for a company called Lensbaby. They have a whole bunch of specialty lenses, but they got their start making an inexpensive lens that you could tilt as you composed your shot.

Why in God’s Green Acres would anyone want to do that? Well, normally, one keeps the plane of the lens exactly parallel to the plane of the sensor, and out in front, everything at a particular distance is in focus. You can think of the volume of space that’s in focus as a rectangular solid with one face parallel to the sensor.

When you tilt the lens, the rules change. The volume of space that’s in focus tilts too (there’s a rough formula, but the math’s not important here). To illustrate, let’s take a look at figure 1. In this diagram, the lens and the sensor are parallel, and the zone in front of the lens that is in focus is parallel to them as well. The girl and the tree are in focus, but the dog is not.
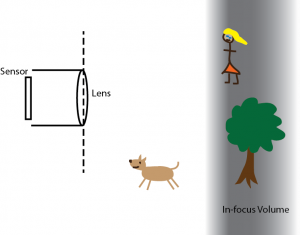
Figure 1: diagram of a photo shoot in a park. The girl and the tree are in focus.

Figure 1: diagram of a photo shoot in a park. The girl and the tree are in focus.

Of course, dogs and girls are much more interesting than trees. How can we get them in focus, and get the tree out of focus so the shot doesn’t seem as cluttered? One way is to tilt the lens.
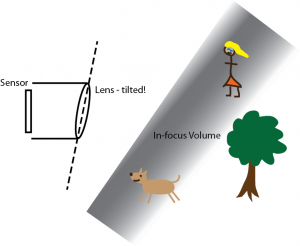
Figure 2: The same setup, but with a tilted lens.

Figure 2: The same setup, but with a tilted lens.

Lensbaby’s products cost substantially less than high-end lens systems, in part because they’re optically pretty low-grade. Still, a few hundred bucks for a set of flawed lenses (even if the flaws are embraced – more on that later), seems a little steep. After poking around a bit, I found sites for people who made their own tilt/shift lenses for just a few bucks. (There are plenty of other links where that one came from.) I decided to try my hand.
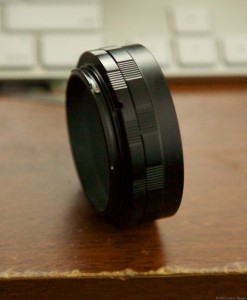
Medium-length section of macro extender tube set

Medium-length section of macro extender tube set

After considerable pondering, I realized that there were a couple of ways I could improve on the designs illustrated, at the sacrifice of a couple more bucks. All those designs involved drilling out a camera body cap to provide the attachment point to the camera. I opted for a cheap Chinese extender tube ($6) to give a much larger surface for mounting the bellows.

Next came the hunt for an appropriate lens. Many of the people who build these buy old, crappy lenses for SLR’s and partially disassemble them to allow clearance between the bellows and the camera body. Others use medium-format lenses, which generally are designed to be mounted farther from the film. Despite reports that these could be found on the cheap, I was not successful in my search. Eventually I stumbled on a Federal Anastigmat lens for $20 and decided that was an acceptable amount to risk.

I got really lucky.
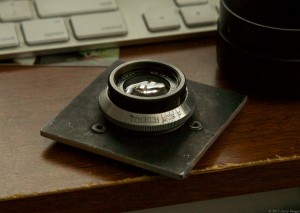
The big investment - the lens.

The big investment – the lens.

I’m pretty sure the lens was originally intended for a photo enlarger rather than a camera, but hey, you need quality optics on that end of the processing, too. Where I really got lucky was with the focal length. I hadn’t given it much thought, but it turns out that lenses like this come in a pretty wide range, and 3.5″ turns out to be close to ideal for my lens design. See the end of the article for tips on how to find a similar lens.
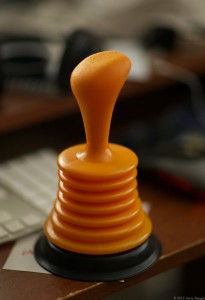
Mini-plunger with bellows construction.

Mini-plunger with bellows construction.

The lens sat on my desk for a few weeks, but recently I decided it was time to get this puppy made. I went down to Home Depot and after a period of wandering found the plunger section. I wanted one that had a bellows style of construction, rather than the typical rubber dome. Happily I hit pay dirt (with a caveat).

I brought the plunger home and after considerable time pondering how best to attach all the pieces together, decided to stop thinking so much and just see what I could come up with. It was time for action!

I started by trimming off the part of the plunger bellows that was clearly too wide.
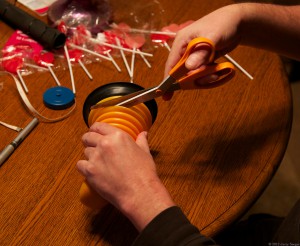
Trimming the plunger

Trimming the plunger


It turns out that that particular extender tube and that particular plunger fit together perfectly, though it took me quite a bit of fussing before I discovered the proper technique for mating the two. After futzing with screwdrivers and pliers (whose scars you can see in the final photos), I just put my weight into it and mashed the thing home.
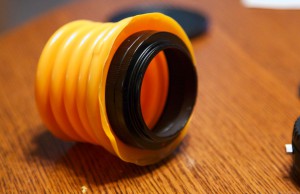
The macro tube and the bellows mated.

The macro tube and the bellows mated.
You can see how much light comes through the plastic.


To attach the lens to the bellows I used a roto-tool and gradually enlarged a hole in the handle end of the plunger until the threads of the lens could bite and I just screwed the thing straight onto the plastic. It’s a lot more secure than I expected it to be.
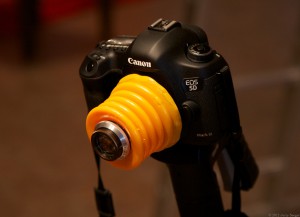
The finished product!

The finished product!


And… that was all there was to it. But, alas, there is a problem. A lot of light gets through the plastic. The first pictures I took had low contrast and a decidedly orange cast to them.

Wrapping something dark around the bellows helped immensely. Here I am taking a tilt-shot with my neoprene knee brace pulled over the lens. Some orange still leaks in through the front plastic, but contrast was improved dramatically.
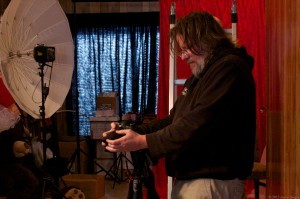
Taking a tilt-lens shot

Taking a tilt-lens shot


Once color-adjusted, the results are pretty interesting. In the following photo you can trace the volume of focus from the lower-left right back to the napkin holder in the upper right. One side of the glue bottle is in focus, while the other isn’t.
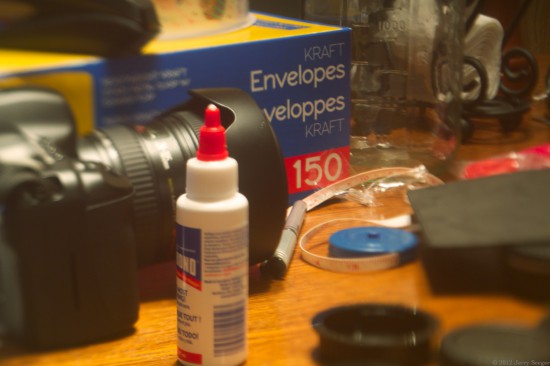
Tilt-lens photo with skewed focal plane

Tilt-lens photo with skewed focal plane

To be honest, I’m not sure exactly what I’m going to do with this thing now that I have it, but the first step is to take a whole ton of practice photos, so when the time is right I’ll be ready.

The biggest disadvantage to this setup is that it takes three hands to take a picture, and since you’re holding the lens steady with your fingers, fast shutter speeds are advised. Some of the lenses in the article I linked to lock down the lens at the desired angle, which would be handy. Lensbaby’s design is structurally pretty similar to mine; they have a version with screws that hold the lens in position.

Another thing about the “anastigmat” lens I used and the offerings of Lensbaby: My little lens is optically quite a bit better than Lensbaby offerings, for better or worse. Anastigmat was a name many lens manufacturers applied when they came up with ways to reduce the spherical aberration and astigmatism of early lenses. Lensbaby, on the other hand, embraces spherical aberration with gusto. This causes the focal zone in the illustrations above to be curved and the edges to be distorted, which can also be fun, and can really pin interest on your subject. The rear elements of my Federal lens can be removed, which I think will give me some pretty major spherical aberration as well. We’ll see. Lensbaby also has a variety of other ways to introduce distortion into photographs, but I’m not going to start experimenting with that until I get the tilting business well under control.

“Anastigmat” is also your key to finding the right glass if you want to follow in my footsteps. Just type that into eBay’s search and you will find a host of old lenses, some quite cheap. (At this writing there’s a nice-looking Rival for $22 and a sort-of-slow Federal for $10.) Choose a focal length in the 90mm range and away you go! (You can use longer macro tubes if you get a longer focal length. $6 gets you a set of three different lengths that can be screwed together.) Some lenses look like they’re only the front element (just one piece of glass); you should stay away from those.

Total cost: $30. When I got down to doing it, it was pretty easy. If you like to tinker, this would make a great Saturday project that could pay dividends with interesting photos for a long time to come. Give it a try!

4

Pinhole Fever

My favorite camera lens is a marvel of technology, an almost perfect example of science serving art. But lately my imagination has been captured by the other end of the lens spectrum: the pinhole.

The idea took root when I saw some russian plastic pinhole lens go on ebay for actual money. The sales pitch was, “recreate the look of this crappy old camera with your modern DSLR!” I agreed that would be a fun thing to do. We put distortion into electric guitar pickups and we dig lo-fi pictures.

But that’s selling the pinhole short. Last night I experimented with the lenses in my stable, determining the smallest details I could hope to resolve. I don’t have a true macro lens, but here’s the thing. A really good macro lens (hundreds or even thousands of dollars) will give you the ability to project images onto your film or digital sensor at a 1:1 ratio – if the thing you’re photographing is 1cm, it will be 1cm on your sensor. With a modern camera, that translates to a whole bunch of pixels.

But wait! With a pinhole, at the cost of maybe two dollars (10 bucks for better image quality) you can get a magnification five times that. Obviously not with the same fidelity, but seriously, five times the magnification means that you can still resolve some amazing details in your subject.

I think a pinhole would also be a better lens for observing the sun than any I currently have in my arsenal.

All that on top of cool vintage-looking shots in the “normal” range. Your subject has to be able to hold still for a while; the pinhole allows much less light through than a typical glass lens. You could argue that the primary function of the glass in lenses is to allow you to have a much bigger pinhole and still be able to focus.

And here’s a fun fact: All those numbers that we use when talking about a lens are actually based on pinholes. When we say a lens has a 50mm focal length, what we mean is that it acts like a pinhole 50mm from the film. The other numbers are similarly derived.

For a given focal length, there is an ideal pinhole size. (OK, that’s not exactly true, but there is an ideal pinhole size to optimize the shot for different preferences.) The goal is to have the light that comes from a specific point on the subject strike a particular point on the sensor. As you can probably imagine, the smaller the pinhole, the smaller the dot of light on the sensor from any given spot on the subject. (This dot is called, rather poetically, the “circle of confusion”.)

So the smaller the better, right?

Not so fast, Sparky! Just when you least expect it, light starts behaving like a wave, and the smaller the pinhole, the more pronounced that effect becomes, until diffraction causes the light from that single point outside the lens to turn into a bright central dot surrounded by fainter rings. The trick then is to minimize the distortion caused by both a too-big and a too-small pinhole, and find the happy balance. Others, happily, have done the math, though they don’t all agree.

I have a plan. I’m going to create two pinholes of different sizes, and mount them on the kind of cap you put on your camera body when you don’t have a lens on it. The caps are already made to attach the same way the manufacturers lenses do. I also intend to make an extension tube that mates with the camera at one end and with a lens cap at the other (using the cap that goes on the back of lenses for storage), and have myself a macro/zoom pinhole. The little pinhole can either go directly on the camera for a 46mm focal length, while the larger pinhole one goes on the end of the tube for telephoto. With the small pinhole on the extension tube, you’re ready for serious macro photography.

I’m fascinated now by the question, “what can a really well-engineered pinhole accomplish?” Besides just getting the size of the hole right, there are the challenges of getting the hole nice and round (irregularities will play hell with diffraction) and shallow. If the hole is too deep (drilled through too thick of material) the corners of the picture are cut off. The camera will quite literally have tunnel vision.

I intend to spend some hours in Father-of-Sweetie’s workshop, experimenting with drilling holes in metal. (I priced out copper sheet and then realized that drilling holes in money (pennies) would be much cheaper.) The first thing to discover is whether it’s merely difficult or completely friggin impossible to get a drill to stop when its tip is 0.09mm through the metal (for the smaller hole, assuming the standard 118ΒΊ point angle of the drill’s tip), and if the resulting hole is round enough. If not, then micro drills are going to be required.

While I don’t mind spending a great deal of time building the thing, I’d like to come up with a process that can be repeated fairly easily. Because if people are willing to pay for a little plastic piece of poo, there might be a group of hobbyists interested in the Ridiculously Over-Engineered Pinhole System. If I can drill the holes efficiently, it might make a nice little cottage industry.

Bonus!

In between the time of writing and the time of posting, there was a time of doing! Here are some results with Quick and Dirty Pinhole 2 (pinhole 1 didn’t pass quality checks):

A few notes:
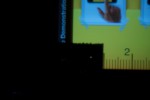
What I set out to do this morning was discover if I had any way to measure the size of the pinholes, and to see if they were actually round. I don’t have a fancy loupe, and the ones that can measure down to things that tiny are quite expensive. I do have a camera, however, and I figured if I could get close enough I could use an image to measure the size and shape of the pinhole.

I made a couple of pinholes in tinfoil. I used my fisheye lens to get down as close as I could to the pinholes (laid on top of a ruler app on my phone) and was able to roughly estimate their size. The first was definitely too big, the second seemed only a little bit too big. So I drilled a hole in a Canon body cap and taped in Quick and Dirty Pinhole 2.

Most of the exposures you see here are thirty seconds, at pretty high ISO to boot. the f-number for QDPH-2 is something like 48mm/0.3mm β‰ˆ f/150. Remember how giddy I was to get a lens that went to f/1.2? Yeah, this is the opposite of that. Such is the way of the pinhole. The side effect of that is that just about everything in the universe will be in focus, including things that are really really close.

Yep, the best tool I have for measuring pinholes is… a pinhole, and the marks on the measuring stick are the pixels of the retina display itself (12.8/mm). I am stoked.

In the last macro shot of QDPH-1, you see some ghosting. I’m pretty sure that was caused by light bouncing back and forth between the two pieces of aluminum foil. In shots of the display only, there is no ghosting.

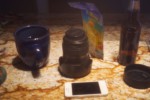
But, my sweetie asked this morning, what’s the point of all this? My answer: It’s fun, and also I think we can get some great vintage-feeling shots. As you can see in the still life, the focus is pretty soft – not appropriate for all the hard-edged items in the shot. I’ll be taking some self-portraits later to see how that goes.

2